The earlier posts in this series built self-contained graphs: one graph, one task, one run. But real workflows often span multiple stages, where each stage produces output that the next stage needs. The pipeline pattern I describe here isn’t an official LangGraph pattern — it’s an architecture I’ve designed to solve that coordination problem, using LangGraph’s building blocks to compose several smaller graphs into a larger system with a shared state model that carries results forward across all of them.
This is part of a series of posts on LangGraph. If you are new to the series, start with A Primer in LangGraph which covers the basics, before working through the later posts. All code examples are drawn from my LangGraphPipeline repository, where you can explore the full implementation.
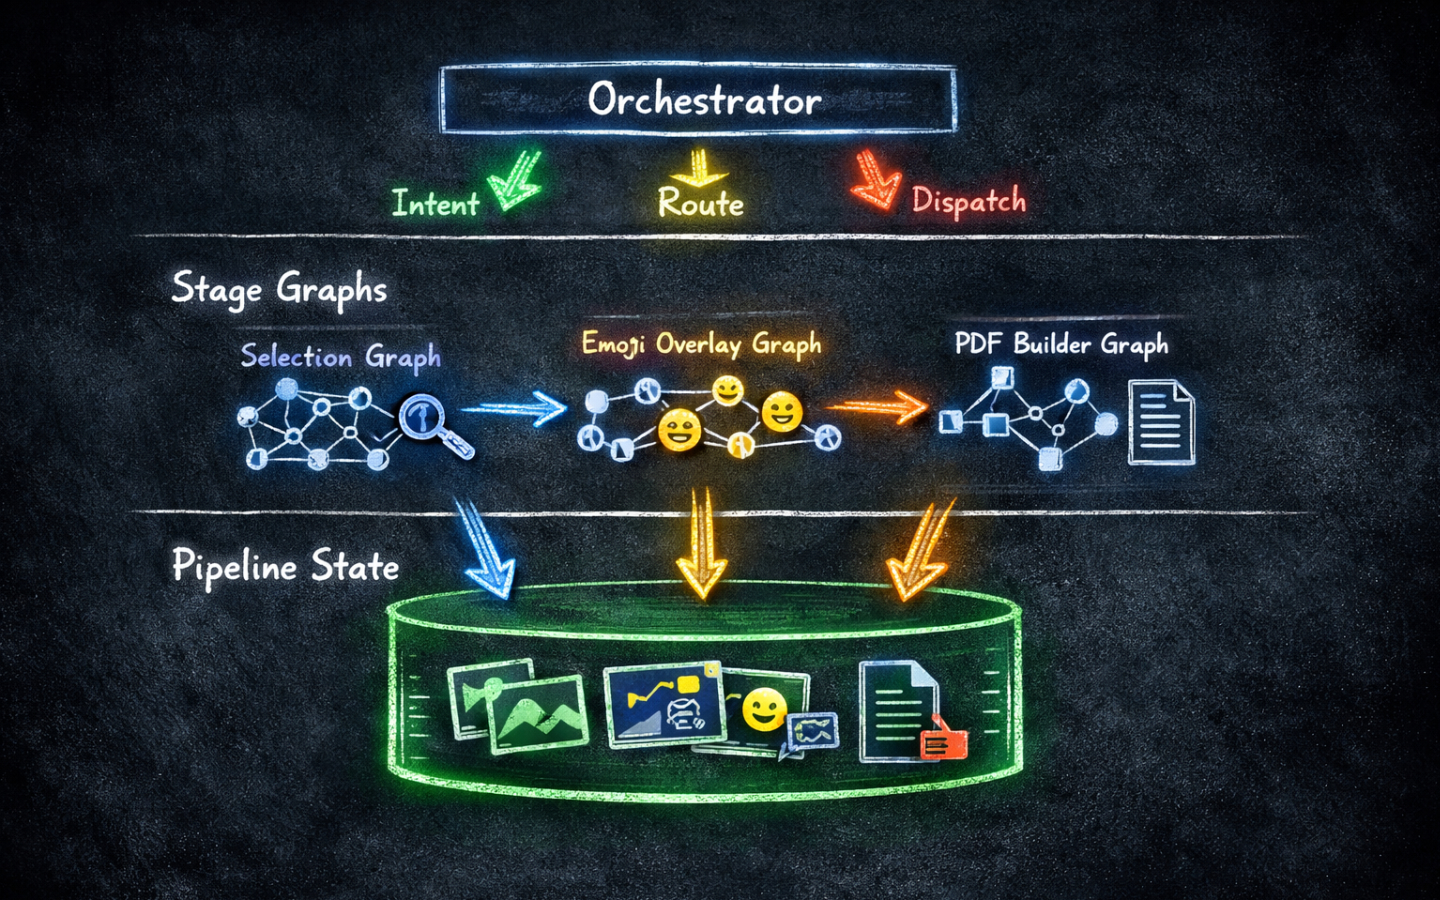
What Is the Pipeline Pattern?
A pipeline is a set of stages where each stage reads from a shared state, does its work, and writes its results back to that state for later stages to use.
Consider an image processing workflow:
- Stage 1 searches a database and selects a set of face images matching a query.
- Stage 2 takes those images and applies emoji overlays to facial features.
- Stage 3 compiles the edited images into a PDF photo album.
Each stage is independent enough to be called on its own, but together they form a chain. You could build this as one large graph with many nodes, but that approach makes each stage harder to test in isolation, harder to reuse, and harder to extend.
The pipeline pattern instead gives each stage its own StateGraph, with its own state type.
A separate PipelineState model is the durable backbone that accumulates results across all stages and persists between sessions.
An orchestrator coordinates which stage runs, threads the pipeline state in and out, and saves it to disk after each run.
Designing the Pipeline State
The shared state is the backbone of the pattern.
Rather than a single state type that every node in the system shares, the pipeline has a durable PipelineState that lives outside the individual step graphs.
from datetime import datetime
from typing import Literal
from pydantic import BaseModel, Field


class ConversationMessage(BaseModel):
    role: Literal["user", "assistant"]
    content: str


class PipelineState(BaseModel):
    last_selected_images: list[str] = Field(default_factory=list)
    last_edited_images: list[str] = Field(default_factory=list)
    last_pdf_path: str | None = None
    conversation_history: list[ConversationMessage] = Field(default_factory=list)
    session_started: str = Field(default_factory=lambda: datetime.now().isoformat())
    last_updated: str = Field(default_factory=lambda: datetime.now().isoformat())
The critical design decision is that each stage writes to its own field and never touches the others.
Stage 1 writes last_selected_images, Stage 2 writes last_edited_images, Stage 3 writes last_pdf_path.
This means the full history of results is always available, even after multiple runs across multiple sessions.
Building Step Graphs
Each stage is a self-contained StateGraph with a step-specific state type.
This keeps state types small and focused on what that one stage actually needs.
Here is the state type for Stage 1, which selects images matching a query:
from pydantic import BaseModel, Field


class Step1State(BaseModel):
    query: str
    selected_images: list[str] = Field(default_factory=list)
    messages: list[str] = Field(default_factory=list)
    error: str | None = None
The processing node reads from this state, does its work, and returns a dict of updated fields:
import random
from langgraph_pipeline.graphs.step1.state import Step1State


def process_face_selection(state: Step1State) -> dict:
    query = state.query
    count = random.randint(3, 8)
    selected = [f"images/face_{random.randint(1, 999):03d}.jpg" for _ in range(count)]
    messages = [
        f"Searching for faces matching: {query}",
        f"Found {count} images.",
    ]
    return {"selected_images": selected, "messages": messages}
Wiring the graph is straightforward — a single node straight from START to END:
from langgraph.graph import StateGraph, START, END
from langgraph_pipeline.graphs.step1.state import Step1State
from langgraph_pipeline.graphs.step1.nodes import process_face_selection


def create_graph():
    graph = StateGraph(Step1State)
    graph.add_node("process", process_face_selection)
    graph.add_edge(START, "process")
    graph.add_edge("process", END)
    return graph.compile()


def run(query: str) -> Step1State:
    app = create_graph()
    result = app.invoke({"query": query})
    return Step1State(**result)
Stages 2 and 3 follow exactly the same structure: their own state type, their own processing node, and the same single-node graph layout. The step graphs themselves have no knowledge of the wider pipeline — they are pure, isolated units that you can invoke and test on their own.
Routing with an Intent Graph
Before a stage can run, the pipeline needs to know which stage the user is asking for. In a production system this would be an LLM call: you would pass the user’s message to a model and ask it to classify the intent and extract the relevant query. The example here uses keyword matching instead, so the pipeline runs without requiring an API key or any LLM access — making it easy to try locally.
The important point is that intent identification is itself a StateGraph, keeping it separated from the pipeline stages and easy to swap out for an LLM-backed version later.
The intent graph has its own state type:
from pydantic import BaseModel, Field


class IntentState(BaseModel):
    user_input: str
    identified_step: str | None = None
    cleaned_query: str | None = None
    messages: list[str] = Field(default_factory=list)
The identify_intent node reads user_input, decides which stage to route to based on keywords, and strips the trigger words so the step graph receives a clean query:
import re
from langgraph_pipeline.graphs.intent.state import IntentState


def identify_intent(state: IntentState) -> dict:
    text = state.user_input.lower()

    # Step 2 keywords checked first as "emoji" and "overlay" are unambiguous.
    if any(kw in text for kw in ["emoji", "overlay"]):
        step = "step2"
        query = re.sub(r"^(apply|add|put|use)\s+(emoji\s+)?(overlay\s+)?(to|on)\s+", "", text).strip()
    elif any(kw in text for kw in ["pdf", "album"]):
        step = "step3"
        query = re.sub(r"^(create|make|generate)\s+(a\s+)?(pdf|album)\s+(of\s+)?", "", text).strip()
    elif any(kw in text for kw in ["select", "find", "search", "faces", "images"]):
        step = "step1"
        query = re.sub(r"^(select|find|search)\s+(faces?\s+|images?\s+)?(of\s+)?", "", text).strip()
    else:
        step = "unknown"
        query = None

    return {"identified_step": step, "cleaned_query": query or text}
Graph assembly is identical to the step graphs:
from langgraph.graph import StateGraph, START, END
from langgraph_pipeline.graphs.intent.state import IntentState
from langgraph_pipeline.graphs.intent.nodes import identify_intent


def create_graph():
    graph = StateGraph(IntentState)
    graph.add_node("identify_intent", identify_intent)
    graph.add_edge(START, "identify_intent")
    graph.add_edge("identify_intent", END)
    return graph.compile()
Wiring the Orchestrator
The orchestrator is the glue that connects everything. It loads the pipeline state from disk, runs the intent graph, dispatches to the right step, updates the shared state, and saves it back.
STEP_REGISTRY = {
    "step1": Step1,
    "step2": Step2,
    "step3": Step3,
}


def run_pipeline(self, user_input: str) -> str:
    # Record the user's message.
    self.state.conversation_history.append(
        ConversationMessage(role="user", content=user_input)
    )

    # Identify which stage to run.
    identified_step, cleaned_query = IntentStep.run(self.state)

    # Dispatch to the matching step and get the updated state back.
    response = "Unknown command. Try: 'select faces', 'apply emoji', or 'create pdf'."
    step_class = STEP_REGISTRY.get(identified_step)
    if step_class and cleaned_query:
        updated_state, response = step_class.run(cleaned_query, self.state)
        self.state = updated_state

    # Record the response and persist everything to disk.
    self.state.conversation_history.append(
        ConversationMessage(role="assistant", content=response)
    )
    self._save_state()
    return response
The step registry pattern means adding a new stage to the pipeline is a single-line change. The orchestrator itself never needs to be touched.
Because the orchestrator selects which stage to run based solely on the user’s intent, there is no enforced execution order. A user can re-run Stage 1 with different search criteria at any point, and when Stage 2 or 3 runs next it will automatically pick up the fresh results. Equally, a user can skip a stage entirely — jumping straight from Stage 1 to Stage 3, for example — and the fallback logic in each step handles missing inputs gracefully. This is a meaningful advantage over a fixed sequential graph: the pipeline follows the user’s intent, not a hard-coded path.
The key architectural principle here is the two-tier state model.
Step-specific state (Step1State, Step2State, and so on) is ephemeral: created fresh for each invocation and discarded when the step graph finishes.
Pipeline state (PipelineState) is durable: it carries results forward across all stages and survives between sessions.
State Chaining Between Stages
Because the pipeline state accumulates results, later stages can consume earlier stages’ outputs automatically.
Each step’s run() classmethod receives both the cleaned query and the full PipelineState, giving it access to everything that has been produced so far:
@classmethod
def run(cls, query: str, pipeline_state: PipelineState) -> tuple[PipelineState, str]:
    # Pull Stage 1's output as the input for this stage.
    input_images = pipeline_state.last_selected_images
    result = step2_graph.invoke({"query": query, "input_images": input_images})

    # Write this stage's result back to the shared pipeline state.
    pipeline_state.last_edited_images = result["edited_images"]
    return pipeline_state, "\n".join(result["messages"])
Stage 3 goes further, implementing a three-tier fallback so it can always produce output regardless of which earlier stages have actually been run:
input_images = (
    pipeline_state.last_edited_images      # prefer Stage 2 output
    or pipeline_state.last_selected_images  # fall back to Stage 1 output
    or ["images/default_001.jpg"]           # final fallback
)
This fallback chain makes each stage independently callable. A user can jump straight to Stage 3 without having run Stages 1 or 2 first, and the pipeline will still produce a result using whatever state is available.
Wrapping Up
The pipeline pattern composes multiple LangGraph graphs into a larger system where each stage is a self-contained, testable unit and a shared state model carries results forward across all of them.
The ideas to take away are:
- Keep step graphs small and focused, each with its own state type.
- Design a durable
PipelineStatethat accumulates outputs rather than overwriting them. - Use a separate intent graph to classify user input and route to the right stage — and design it to be replaceable with an LLM-backed version when you’re ready.
- Build an orchestrator to thread state in and out of each step graph and persist it between sessions.
Because each step graph is isolated, you can add human-in-the-loop interrupts, structured output, or tools to any individual stage without touching the others.
Browse the LangGraph tag for more posts in this series. Happy coding!